
Choosing a Camera for License Plate Recognition (What Actually Matters)
Some links in this post are affiliate links. If you buy through one I may earn a small commission at no cost to you; it doesn't change what I recommend. As an Amazon Associate I earn from qualifying purchases.
Most "best LPR camera" lists are written by people who have never tried to read a plate at 30 mph. I have. My front-yard camera has logged well over 10,000 plates, and almost everything I learned about picking the hardware comes down to one question: how many pixels land on the plate?
This post is only about choosing and placing the camera. The settings I run on the camera itself (shutter, gain, IR, day/night profiles) are getting their own article with screenshots from the admin UI.
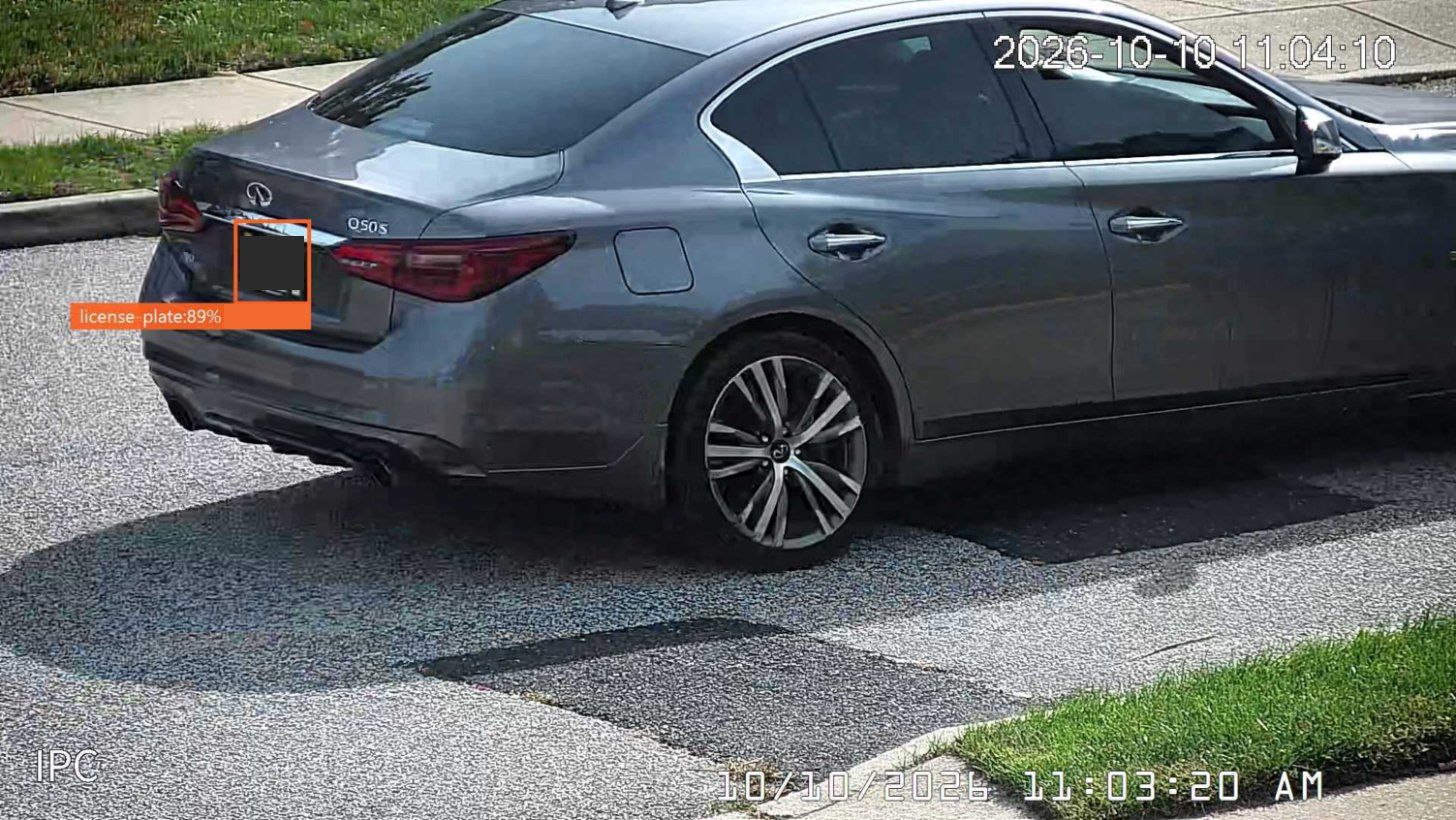
The photo at the top is a real capture from my camera this morning, with the plate blacked out. Blue Iris found the plate at 89% confidence and read every character correctly. The camera isn't fancy: a 2 MP bullet with a motorized zoom lens. What makes it work is that the lens is zoomed in so the plate is about 90 pixels wide in a 1080p frame.
Pixels on Plate Is the Whole Game
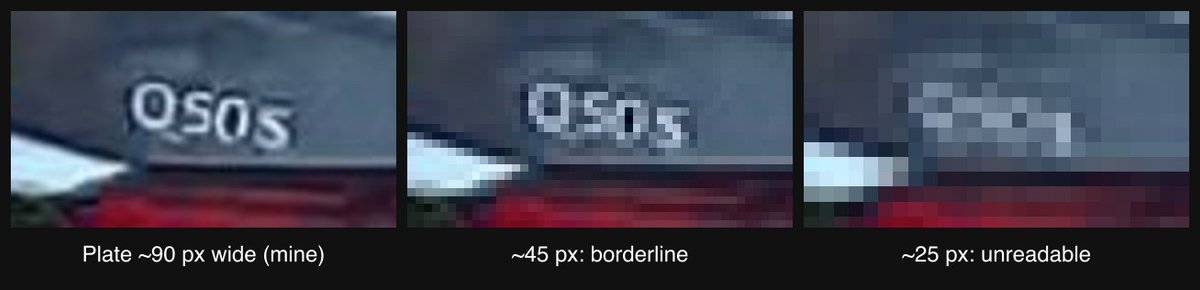
Resolution numbers on the box don't matter much. What matters is how many pixels end up across the plate where cars actually pass. Here's the same detail from that frame at the resolution I get, then downsampled to what a wider lens or a cheaper camera would give you:
My rough targets:
- 80+ px across the plate: reliable reads, even with some motion blur.
- 40–60 px: works in good light, falls apart at night.
- Under 30 px: the AI may detect a plate, but OCR is guessing.
This is why a 4K camera with a wide lens usually loses to a 2 MP camera with a zoom lens. The 4K camera spreads its pixels over your whole yard. The zoom lens puts them on the one spot cars drive through.
Lens: Zoom Beats Megapixels
Pick a camera with a motorized varifocal (zoom) lens. You won't know the right focal length until the camera is mounted, and being able to zoom and refocus from the web UI saves a lot of ladder trips.
How much zoom you need depends on distance:
- Driveway or gate, 15–40 ft: a 2.7–12 mm lens is enough.
- Street, 40–100+ ft: you want something in the 5–60 mm range.
Frame tight. My field of view covers a little more than one lane. If you can see your whole front yard, you're zoomed out too far for plates. Use a second camera for the overview.
Sensor: Bigger and Fewer Pixels
At night, plate reads come down to how much light the sensor can gather at a fast shutter. A 1/2.8" or larger sensor at 2–4 MP is the sweet spot. An 8 MP sensor of the same physical size has smaller pixels, each one collecting less light, so it gets noisier at night.
Look for "Starlight" or "ultra low light" in the product name. That's marketing, but on Dahua-based cameras it does reliably mean a larger, more sensitive sensor.
Placement and Angle
Even a perfect camera fails if it's in the wrong spot:
- Keep the angle shallow. Aim for less than about 30° horizontally and vertically between the camera and the plate. Steep angles squash the characters.
- Pick a spot where cars slow down or line up straight: a driveway entrance, a stop sign, or a straight stretch, not a curve.
- Mount around 8–10 ft high. High enough to stay out of reach and over hedges, low enough to keep the vertical angle shallow.
- Watch for headlights. A camera facing oncoming traffic at night gets blinded. Catching rear plates of cars driving away is much easier.
My camera is on the corner of the house and catches cars at an angle as they pass. That's why the plate in the capture above is slightly skewed but still easy to read.
What I Use and Recommend
My camera is a Loryta (Dahua OEM) IPC-HFW5241E-Z12E, a 2 MP Starlight bullet with a 5.3–64 mm motorized lens. It has since been replaced by the EmpireTech model below, which is the same Dahua hardware family and what I'd buy today.
For shorter distances like a driveway or gate, a turret with a bigger 1/1.8" sensor and a shorter zoom is a better fit and a bit cheaper:
Whichever you pick, get a matching junction box. It hides the PoE connection from the weather and makes mounting much cleaner:
Both cameras are PoE and work with Blue Iris out of the box.
Next Steps
Once the camera is up, the next steps are software and settings:
- Reading License Plates with Blue Iris 6 covers the AI model, triggers, and getting plate reads out of Blue Iris.
- Cutting Blue Iris False Alerts with AI covers the alert confirmation settings I use on the plate camera.
- How License Plate Recognition Actually Works explains why pixels on plate matters so much to the OCR step.
The camera-side settings post (exposure, IR, and day/night profiles) is coming next. Questions? Reach me at support@platelytics.app.
Want the next one?
New posts and product updates. No spam.